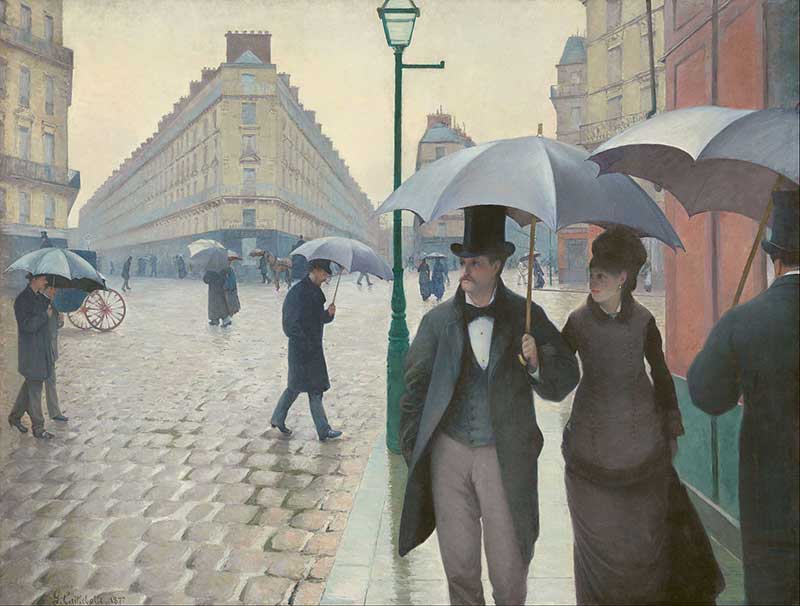
Gustave Caillebotte was an early Impressionist painter born in 1848 and dying in 1894. His painting titled Paris Street; Rainy Day, 1877 depicts what he had seen in the streets of Paris using a special tool, known as the camera lucida, during his lifetime which was invented by Sir William Hyde Wollaston in 1807 and by Professor Peter Barlow in the year 1730.
Definition of Camera Lucida
Camera Lucida means light chamber in Latin. The name refers to a drawing tool that was invented by Swiss scientist Horace-Bénédict de Saussure in 1799. At its most basic, a camera lucida has two lenses: one projects an image onto a viewing surface, while another lens — usually above or below — provides magnification, allowing artists to create larger drawings more easily than if they were to use only their eyes.
The first form of camera lucida had been around since 1685, but de Saussure took some design liberties with his own version. And he made it portable! He attached his invention to a folding wooden box so that artists could carry it in their pocketbooks
Background of Camera Lucida
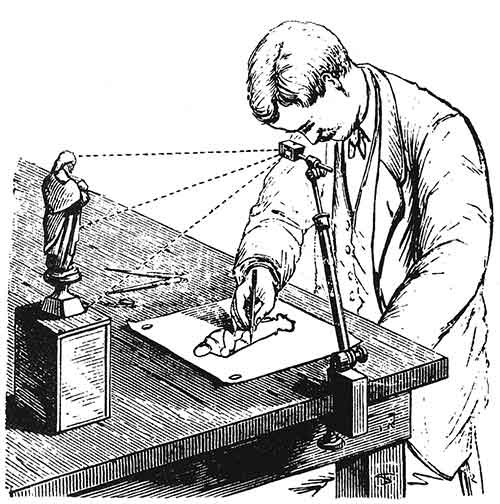
A camera lucida (Latin for light chamber) is a simple optical device that allows an artist to trace an image in order to create a corresponding drawing, painting or print. The device consists of a prism that reflects an image from its base onto tracing paper at right angles to its face, as well as a magnifying lens. Because of its design, it is also known as a crystal surveyor or artists’ transverse. It can be used with a variety of media including pencils, charcoal, pastels, watercolor and ink.
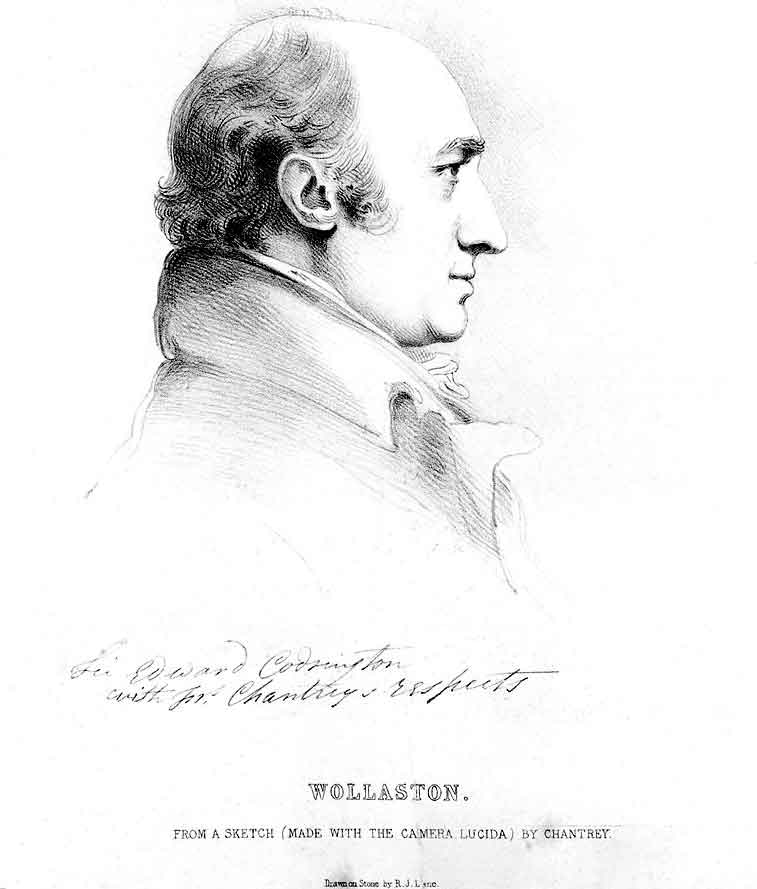
The camera lucida has been widely used since its invention by Sir William Hyde Wollaston in 1807 as an aid to accurate drawing and perspective rendering by visually superimposing images from two-dimensional representations—pictures or photographs—onto a view through the prism directly on top of what one sees with their own eyes.
History and Working Principle of Camera Lucida
A Brief History of Camera Lucida : Though daguerreotype, a revolutionary invention in photography, was invented by Daguerre in 1839,
old masters like Leonardo da Vinci was aware of its principle hundreds of years ago. It’s hard to say when exactly cameras with projection attachments were first used. Maybe Da Vinci made one while he was observing human body proportions or while drawing human figures? Some clues hint that painting enthusiasts in Europe had started using them as early as 16th century. The earliest ones weren’t called camera lucida, but were introduced as mirror device for painters or simply drawing aid devices instead.
Artist who used lucida on Street
Gustave Caillebotte’s Paris Street; Rainy Day. Gustave Caillebotte was a French painter who first photographed his city as early as 1877 (he also took some of the very first photographs of people). In 1883, he became one of only three artists to be elected to membership in both The Society of Painters and Engravers in London and The Société Nationale des Beaux-Arts in Paris. His painting entitled Paris Street; Rainy Day from 1877, which depicts wet cobblestones and a large building shrouded in thick rain, is widely regarded by art historians as a watershed moment for impressionism. Two years after its creation—in September of 2013 at an auction at Christie’s—the painting sold for $22 million dollars making it by far the most expensive 19th century piece ever sold at auction.
Tips for a good shot with camera lucida
There are a few tricks to make sure you get a great image with your camera lucida. First, place your paper or canvas overtop of your easel. Then, look through your viewfinder (if you’re using an actual lens) or at your cut-out frame (if you’re using a prism). You should be able to see an inverted image of what’s on top of your easel. Adjust as necessary until you have something aesthetically pleasing. Third, after making any final adjustments (such as framing or centering), lightly trace over your subject with pencil. Finally, flip down your easel so that you can use pencil for shading in your piece. Be patient—this may take some time! But when you start to shade in different areas, things will come together quickly and beautifully. When you’re done outlining everything you want to include in your painting, go ahead and fill it all in!